Headless WordPress REST / JSON API + React / NextJS (with App Router) Part 2
Posted Saturday, June 17, 2023
This series of blog posts is about how I set up this very site you’re on. Well, most of the way.
The back end is WordPress as a Headless CMS using the built in REST/JSON API, and the front end is a React / NextJS app (using the new App Router). I’ll also be using SCSS for styling, and Typescript for making the data transfer more safe and predictable, and some other goodies.
In the first post in the series, we set up WordPress, NextJS, made some blog posts, and used NextJS’s upgraded fetch API to fetch them and display them.
This time we’ll implement TypeScript and figured out a good CSS strategy for a site built in Next but also needing to export the CSS for the WP editor.
Let’s keep going!
6. Implement Typing
Go back to your WordPress API URL that we tested back in section 3, and open it in your browser. Copy the JSON, and paste it into a JSON TypeScript Interface generator like like QuickType. There’s a VSCode plugin too, but unless you’re doing it a lot, I’d just keep your VSCode lean. Make sure it’s set to TypeScript and make sure to rename the main interface to BlogPost.
Why are we doing this? This JSON response (well, the interface we’re building from it) just became a set of strict rules for how JSON blog post objects should always be structured as they move around our NextJS app. We’re going to be referring to JSON blog post objects in potentially dozens of files, and in a big app, lots of developers might be writing code that refers to blog post objects, so having this set of constraints is actually really helpful.
Create a folder at /src/interfaces/ and a file called blog.ts and paste all those interfaces into it. Take a look through the output and make sure it didn’t do anything crazy. When I did it, QuickType noticed that the guid and title properties refer to nested objects with the same structure, so it made them both use the same interface, but we don’t want that. The fix was to uncheck an option labeled Merge Similar Classes and run it again.
In the /src/services/blog.ts file, import the interface file, and add the type to the data variable in the getPostsArchive function. It should look like this after you’re done.
import { BLOG_ENDPOINT } from './endpoints'
import { BlogPost } from '@/interfaces/blog'

export const getPostArchive = async () => {
	const response = await fetch(BLOG_ENDPOINT, {
		next: { revalidate: 60 },
	})
	const data: BlogPost[] = await response.json()
	return data
}
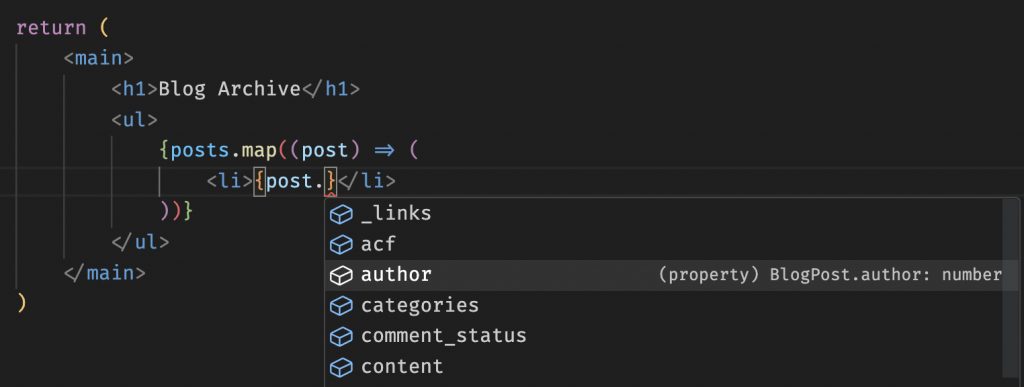
From this point forward, NextJS knows what a BlogPost object should look like, and if you attempt to use a property that a BlogPost is not meant to have, it will throw a good descriptive error as soon as you save the file. Additionally, if you’re using a good code editor like Visual Studio Code, as soon as you refer to a variable that contains a BlogPost object, it will make code suggestions based on the correct structure. See screenshot below.
7. Single Post Page
Next lets make the single post page, which you should remember is going to be at the URL /blog/[slug], and in our files at /src/app/blog/[slug]/page.tsx.
First we need to add a service for fetching on blog post from WordPress. In your blog service file, add a new function, getPostSingle. It will be almost the same as the getPostArchive function, but with these differences:
- It will receive the slug of the blog post we’re looking for
- The WordPress API URL will be slightly different, and use that slug, and
- We’ll parse the results down to return just the one blog post (or null).
export const getPostSingle = async (slug: string) => {
	const response = await fetch(BLOG_ENDPOINT_SINGLE + slug, {
		next: { revalidate: 60 },
	})
	const data: BlogPost[] = await response.json()
	if (data.length > 0) {
		return data[0]
	} else {
		return null
	}
}
Next we’ll implement this new service in the page.tsx file the same way we did with the getPostArchive service, but with these changes:
- We’ll pass in the slug
- We don’t need to loop through posts, since there should be just one
- We will do a null check on post, and show a “Post not found” message
- We’ll add a “Back to archive” link to make it navigable
So it should end up looking like this:
import Link from 'next/link'
export default async function BlogSingle({ params }: { params: { slug: string } }) {
	const post = await getPostSingle(params.slug)
	return (
		<main>
			{post && (
				<>
					<h1>{post.title.rendered}</h1>
					<h2>Posted on {new Date(post.date).toLocaleDateString()}</h2>
					<div dangerouslySetInnerHTML={{ __html: post.content.rendered }}></div>
				</>
			)}
			{!post && (
				<>
					<h1>404</h1>
					<p>Post not found.</p>
				</>
			)}
			<Link href="/blog">Back to Archive</Link>
		</main>
	)
}
Note that the dangerouslySetInnerHTML part is necessary because WordPress is sending us fully formatted HTML. If we just put it on the page the same way we did with the simple title string, it would show the HTML code as text on the page.
And finally, in order to get to this page, we need to link to it from the archive, so we’ll add a link to go with each post title like so:
<a href={'/blog/' + post.slug}>Read Post</a>You should now have a slightly ugly, but fully functional, Headless WordPress blog with a Next front end.
8. Implementing CSS/SCSS
The example NextJS app comes with CSS modules in place. The biggest problem with that is there’s no easy way to extract the resulting CSS, and inject it into the WordPress editor for “editor styles“. It might be okay for simple content like blog posts to appear one way in the editor and another way on the site, but once we start implementing Gutenberg blocks and using the WordPress editor to author whole pages with complex layouts, we need to have one set of CSS that applies everywhere.
First, let’s add Sass to NextJS. In your terminal, run:
npm install --save-dev sassThen take a look at src/app/layout.jsx. This is the template file that defines the outer wrapper of every single page in the app. They all get nested inside this one. You should have a line like import './globals.css' at the top, importing the global styles for the example app. Let’s change that and add some proper organization. Create a folder at /src/scss/ and add subfolders for however you usually like to organize your scss code. Add an index.scss file in there and import all your other scss from there. This is also where you might import a CSS framework like Bootstrap, Bulma, Materialize, etc. And change the import in layout.tsx to import this new file, like this:
import '@/scss/index.scss'If you need a break from the heavy JS to write some beautiful CSS (like I do), go off and make our blog pages beautiful. If you want to get some basic styles in there and move on right away, run this in the terminal
npm install bootstrapAnd add this to the top of the index.scss file
@import 'bootstrap/dist/css/bootstrap.css';Global SCSS, check.
9. Bringing the Front End CSS to the WordPress Editor
This part is a bit tricky. We’ll build the site and make it beautiful in NextJS, but when we editor content in the WordPress editor, we need an accurate preview. That means the CSS from the front end has to be extracted and sent to the back end. To further complicate that, NextJS never actually creates one monolithic CSS file like most traditional websites; it creates chunks and sends them to the front end as needed for performance.
There are ways to automate this, but I suggest you get it working semi-manually first, and then figure out your automation strategy based on your own web hosting, code hosting, etc.
First we need to “eject” the css code from our NextJS app. Create a file at the root of our project called eject-css.js and paste in this code.
const fs = require('fs')
const sass = require('sass')
console.log('Ejecting editor style: ', __dirname + '/src/scss/index.scss')
const result = sass.compile(__dirname + '/src/scss/index.scss', { outputStyle: 'compressed' })
fs.writeFile(__dirname + '/editor-style.css', result.css, (err) => console.error(err))
Anyone who has used Node for CSS or JS compiling in the past might recognize this. It compiles index.scss and all it’s referenced SCSS files into a single editor-style.css at the root of the project. You can run it by typing node eject-css, or you can add a line to the scripts section of your package.json to call it with an npm script like this:
"eject-css": "node eject-css.js"After you run that script, manually copy the produced editor-style.css file over to your WordPress theme. Yes! We’re finally back in the WordPress code. Finally, add these lines to the functions.php file to tell it to pull this css into the editor.
add_theme_support('editor-styles');
add_editor_style('editor-style.css');
Now if you go edit one of your block posts, you should see the styles from your site applied in the editor. Bam!
Wrap Up
That was a lot. This time we added TypeScript and all our interfaces, added SCSS, and figured out how to eject the CSS for use in WordPress. Nice.
Next Post
In the next blog post, we’ll take on a custom post type, custom fields, and getting images from WordPress to display on our NextJS front end.